
Tired of mediocre coffee from your automatic drip machine? Craving a cup that truly highlights the unique nuances of your favorite beans? Welcome to the world of pour over coffee! This manual brewing method might look intricate, but it’s your key to unlocking unparalleled flavor clarity and control. Consider this your essential guide to mastering the art and science of pour over coffee right in your own kitchen.
What Exactly Is Pour Over Coffee?
At its core, pour over is a simple concept: hot water is poured manually, slowly, and evenly over coffee grounds held in a filter cone, dripping directly into a carafe or mug below. Unlike immersion methods (like French Press) or automated drip machines, pour over gives you complete control over every variable, from water temperature and flow rate to saturation time. This control is precisely why it’s favored by coffee enthusiasts seeking the cleanest, brightest flavors.
Why Choose Pour Over? The Flavor Advantage
So, why go manual when machines exist? The benefits are clear once you taste the difference:
Unbeatable Control Over Brewing
You dictate the water temperature, how fast you pour, and where the water hits the grounds. This allows precise adjustments to extract the exact flavors you desire from specific beans, something impossible with automated machines.
Exceptional Clarity and Nuance
Pour over methods, especially with paper filters, tend to produce an incredibly clean cup. They filter out most oils and fine sediment (unlike a French Press), letting the subtle tasting notes – fruity, floral, nutty, chocolatey – shine through without any muddiness.
The Rewarding Ritual
There’s a mindful, almost meditative quality to making pour over coffee. The focus required, the gentle spiral of water, the fragrant aroma – it turns your morning coffee routine from a button-push into a satisfying craft.
Gear Up: What You’ll Need for Perfect Pour Over
You don’t need a lab full of equipment, but a few key items are essential for great results:
The Brewer (Dripper)
Several styles exist, each with slight differences:
- Hario V60: Conical shape with spiral ribs, large single exit hole. Known for bright cups, requires precise technique.
- Kalita Wave: Flat-bottomed with three small holes. More forgiving, known for consistency and balance.
- Chemex: An elegant glass carafe and brewer in one. Uses thicker filters for an exceptionally clean cup.
- (Others exist, like Bee House, Origami, etc., but these are popular starting points)
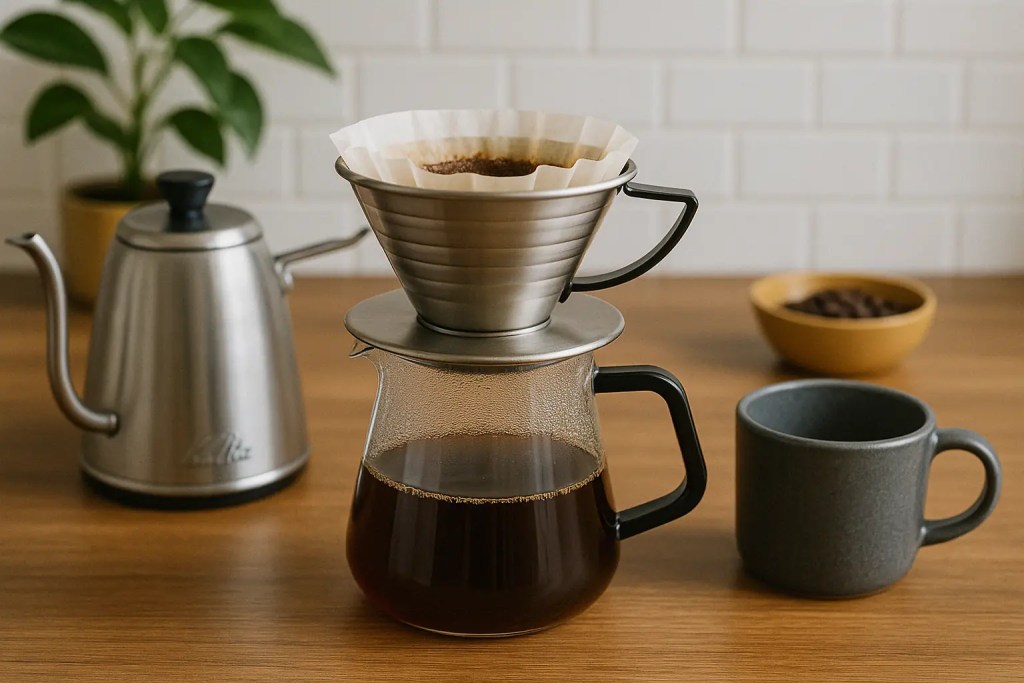
Kalita Wave Dripper: more forgiving, known for consistency and balance
Quality Filters
Use filters specifically designed for your brewer shape (cone, flat-bottom, Chemex). Consider oxygen-bleached (less paper taste) or natural unbleached filters.
Gooseneck Kettle
This is crucial. The long, narrow spout provides the control needed for a slow, precise pour. A standard kettle just won’t give you the same accuracy. Electric variable temperature kettles are a bonus for dialing in exact temperatures.
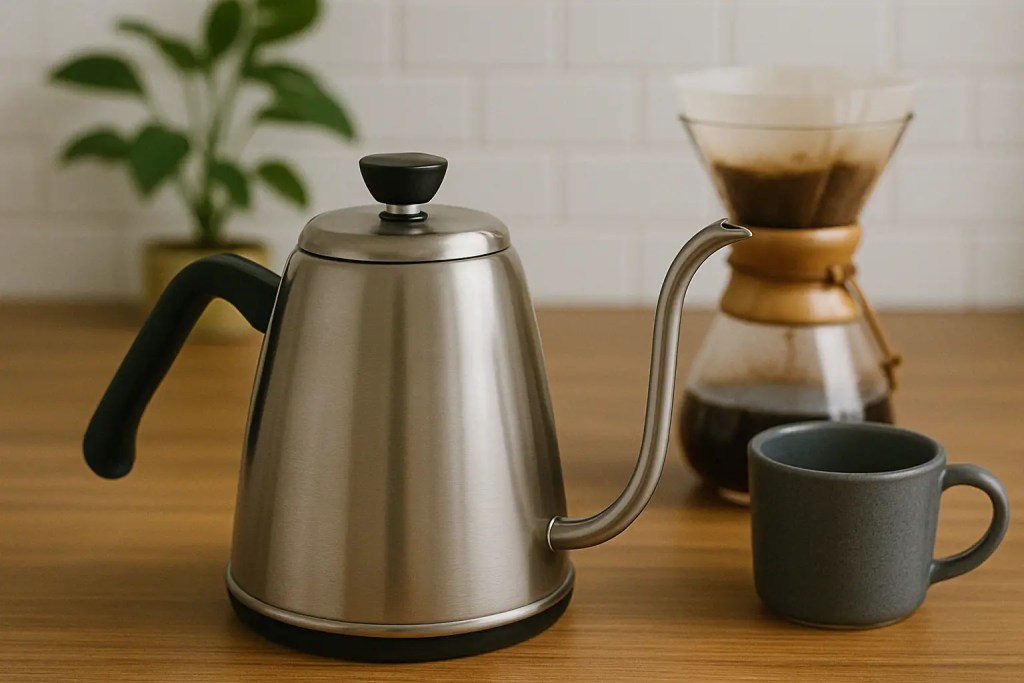
Gooseneck Kettle: provides the control needed for a slow, precise pour
Quality Grinder
Essential for consistent grind size, which is vital for even extraction. Blade grinders produce inconsistent particle sizes, leading to poor flavor. (Remember our article on ditching blade grinders!)
Digital Scale
Precision matters! Use a scale to measure both your coffee beans (dose) and your water, allowing you to maintain a consistent coffee-to-water ratio. Aim for one measuring in grams with a timer function.
Freshly Roasted Coffee Beans
Your brew can only be as good as your beans. Start with fresh, quality whole beans.
The Pour Over Masterclass: Step-by-Step Brewing Guide
Ready to brew? Let’s use a generic pour over process (adapt slightly for your specific brewer’s recommendations):
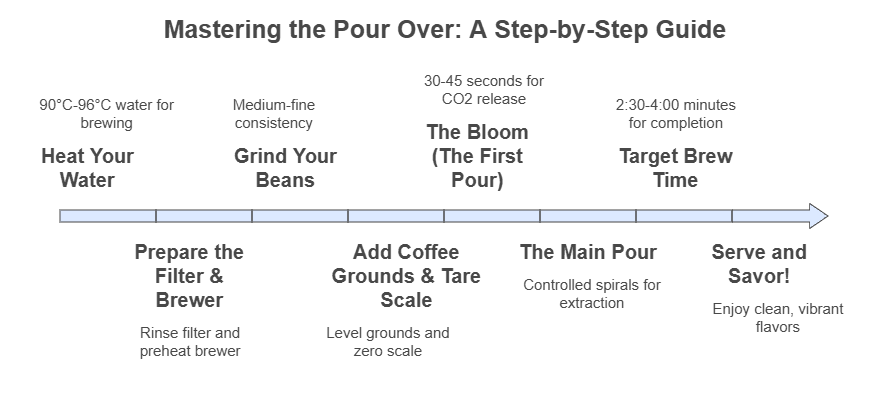
Step 1: Heat Your Water
Bring fresh, filtered water to the ideal temperature, typically between 90∘C−96∘C (195∘F−205∘F). Lighter roasts often benefit from hotter water, darker roasts slightly cooler.
Step 2: Prepare the Filter & Brewer
Place the paper filter into your dripper. Pour hot water through the filter (and preheat the brewer and carafe/mug). This rinses out any paper taste and prevents temperature loss during brewing. Discard this rinse water.
Step 3: Grind Your Beans
Grind your chosen amount of coffee to a medium-fine consistency – think coarse sand or sea salt. For most pour overs, a good starting ratio is 1:15 to 1:17 (e.g., 20g coffee to 300-340g water).
Step 4: Add Coffee Grounds & Tare Scale
Add the ground coffee to the filter, gently level the bed, and place the entire setup (carafe, brewer, filter, grounds) onto your scale. Tare the scale to zero.
Step 5: The Bloom (The First Pour)
Start your timer. Pour just enough hot water (about 2-3 times the coffee weight, e.g., 40-60g for 20g coffee) to saturate all the grounds evenly. Start pouring in the center and spiral outwards. Let it sit for 30-45 seconds. You’ll see the coffee bed bubble and “bloom” as CO2 escapes – crucial for even extraction later.
Step 6: The Main Pour
Continue pouring the remaining water slowly and steadily. Use gentle, controlled spirals, working from the center outwards and back, avoiding pouring directly onto the filter paper. Some prefer “pulse pouring” (adding water in stages), others a continuous slow pour. Keep the water level consistent, not flooding the brewer.
Step 7: Target Brew Time
Aim for a total brew time (including bloom) typically between 2:30 and 4:00 minutes, depending on the brewer, batch size, and coffee. If it’s too fast, grind finer; too slow, grind coarser.
Step 8: Serve and Savor!
Once the water has dripped through, remove the brewer. Give your delicious pour over coffee a gentle swirl and enjoy the clean, vibrant flavors you’ve unlocked.
Troubleshooting Common Pour Over Problems
- Coffee Tastes Sour/Weak: Likely under-extracted. Try grinding finer, using slightly hotter water, or extending the brew time with a slower pour.
- Coffee Tastes Bitter/Harsh: Likely over-extracted. Try grinding coarser, using slightly cooler water, or shortening the brew time with a slightly faster pour.
- Brew Stalls/Chokes: Water takes too long to drip through. Usually caused by grinding too fine, too many “fines” (coffee dust) from a poor grinder, or pouring technique that compacts the bed.
Taking Your Pour Over to the Next Level
Once you’ve mastered the basics:
- Experiment with coffee-to-water ratios.
- Explore different beans – single origins shine with pour over!
- Refine your pouring technique (speed, patterns).
- Try different brewers (V60, Kalita Wave, Chemex) to taste the subtle differences.
The Rewarding Path to Perfect Coffee
Pour over coffee is a journey, not just a destination. It takes practice, but the reward is a truly exceptional cup of coffee tailored exactly to your preference. Embrace the process, experiment, and enjoy unlocking amazing flavor!

Leave a comment